Tuesday, November 20, 2007

GPS Part 3 -- How to create GPS tracks for Google Earth

The GPS Part 2 post discussed how to use a GPS unit for pre-trip planning. This post will focus on using a GPS unit for post-trip recording, specifically, how to create a record of your trip in Google Earth.

Several years ago I was talking with a venerable motorcyclist about memorable rides. During the discussion, he opened his top box and pulled out a Rand McNally road atlas turning to the page showing the entire United States. On this map he had highlighted in yellow every road he had ridden in the last year. He was proud, and rightly so, of the amount of yellow on the map.
Rand McNally 2008 the road atlas, United States | Canada | Mexico

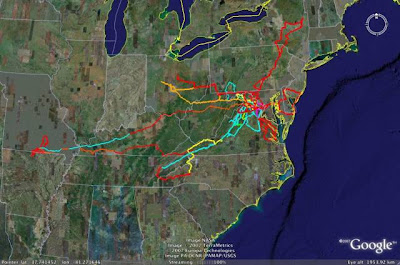
This motivated me to do the same using my GPS and Google Earth. Here's an example of some of the rides I took in 2006 & 2007:


Recording your track with GPS
All GPS units I've worked with can be put into a mode to record position information (latitude & longitude). Most will record other data including altitude (giving 3-dimensional position), speed, compass direction, etc. These data can be saved as a file (document) on your computer for further processing.

To use this feature on most GPS units is as simple as turning it on--read the manual for how. The important setting for this mode is how often to capture the position data. You want to record often enough to create a smooth track of where you've been, but not so often that the position file grows to ungainly size. For long, multi-day trips, the file can be very large. It's important to watch this and download the data to a computer or memory card (a feature of some GPS units) to keep the unit from overwriting earlier data when its memory gets full.

Viewing track data in Google Earth
If you haven't used Google Earth, you don't know what you're missing. Untold hours can be spent looking at your home, your neighbor's home, your city, your state, other states, other countries, etc., etc. If your computer has the horsepower and you've got a high speed internet connection, you owe yourself this free program from Google.

To use GE to view your track data, you must transform the GPS position information into what is called 'KML format' (GE can also read data in the compressed KMZ format). First determine whether the software that comes with your GPS unit will save data in KML format. If it does, you're set. If it doesn't, you need a converter.

I have had excellent results with the GPS data converter program GPS Babel. (You'll need to download & install this program. It is 'support ware'--the software is free using the GNU license; the developers request donations. Note that this program runs on many platforms including the Mac...they deserve a donation!) My Zumo outputs position data using the GPX format. With GPSBabel and a couple of mouse clicks I have a KML file ready to be read by Google Earth. It's that easy.

If you find GPS Babel a bit daunting, check out the web services at GPS Visualizer for converting GPS data. There is a KML converter at the site that accepts GPS data in a pre-defined format. There is another page that provides a web interface for GPS Babel so you can convert GPS data without having to download the GPS Babel program.

In GE you can change the width of your track, make it semi-transparent, change the color, etc. You can also add photos taken along the way. GE can be a platform for recording your memorable rides and sharing with your friends and family.

Have fun!


Sunday, November 18, 2007

GPS Part 2 -- How to create GPS routes

As promised in my previous post on GPS units, this posting describes how to use a GPS for more than watching yourself travel along on a map.

Using your GPS for routing
One of the most useful features of GPS units is its ability to display a route from your starting point to your destination. The latest units give you turn-by-turn directions with many even "speaking" the directions. Route planning allows you to spend time considering how you want to get to your destination if the shortest or quickest way is not the goal. For many motorcycle rides, how you get there is just as important as arriving.

Routes in real time
The simplest way to create a route for most GPS units is to enter a destination address and let the unit determine the "best" route automatically. Most GPS units use a version of Dijkstra's algorithm for finding the shortest path from one point to another. I generally use the built-in routing function when I need to quickly get from point A to point B without much regard to how I get there. For most of my motorcycle trips, the calculated "best" route is generally not the route I want to take.

Routes using software that came with your unit
When you want to travel a specific route, for example along a scenic highway or to stay off the interstate, you need to manually create the route. Generally, the easiest way to do this is to use the software that comes with your GPS unit. Basically, you will put the mapping program into "route mode", then click points along your desired route from start to destination. The specific steps will depend on your particular mapping program. When finished, connect your GPS unit to your computer (typically via USB), and click the transfer button to download the route to your unit. When you're ready to navigate, choose this downloaded route in lieu of letting the unit calculate a route.

Routes using the web
If you've been reading this blog, you know I suffered a computer crash that turned out to be more serious than a dead hard drive. This computer was a Windows XP machine so software like Garmin's MapSource and a myriad of other applications for mapping worked without a hitch. I haven't personally done extensive research, but based on information from various podcasts and web sites, it appears most GPS manufactures only provide Windows compatible software.

Presently, I'm conducting an experiment to see if I can function with minimal aggravation using a Mac running OS X. A self imposed restriction in this experiment is to avoid purchasing software. This has directed my focus to the web, and so far, I've had interesting results. As I become more experienced in the various tools, I will provide updates through subsequent blog postings.
Apple MacBook Pro MA896LL/A 15" Notebook PC (2.4 GHz Intel Core 2 Duo, 2 GB RAM, 160 GB Hard Drive, DVD/CD SuperDrive)


An aside:
Bookmark GPS Visualizer. There's much info here that I haven't fully digested. It's likely that most of what you want to do with a GPS can be done from this web site.


My Garmin Zumo ingests route, waypoint, and tracking data in GPX format. (This is interesting since Garmin has its own proprietary data format.) So, I investigated web services that output route data using GPX.

I very much like Google maps. It is easy to enter a starting point and a destination and have Google maps determine a route. You can click the 'Avoid highways' option which keeps the route off of the interstate. Further, you can click and drag the route to other roads or intervening destinations if desired. In short, you can easily create a custom route from start to destination. Google maps also provide turn-by-turn directions and calculate the overall mileage and estimate the travel time. Because of its ease of use, Google maps is an integral part of my motorcycle trips planning.

So, an ideal, no cost solution for my Mac is to have some utility that will take the Google maps route data and output a GPX formatted file. Kudos to the author of the Communications From Elsewhere blog who has created a Google maps to GPX converter.

To use it, you need to bookmark the GMapToGPX 'bookmarklet' found at the site. Then go to Google maps and create your route. Click the bookmarklet. A new page is generated with the route data in GPX format ready for cut & paste into any text editor. Transfer this file to your GPS unit and you're good to go. I've found that clicking each option button so they read "Route Track Points" provides me with the best output for my GPS unit. Experiment to see what works best for you. Note, there's no reason you can't use this with your Windows or Linux based computer.

An example of directions provided by Google maps from Washington DC to Manhattan:

View Larger Map

After a couple of drag & drops, a more scenic route along the east coast:

View Larger Map

Here's what the GMapToGPX bookmarklet provides when clicked. Cut the text from the window and paste into any text editor. Save as a plain text file. Then transfer it to your GPS unit.


Good luck!
Post comments if you find this useful.

Friday, November 9, 2007

GPS Part 1 -- Don't leave home without it

Unless you've been living under a rock, you've likely heard of the Global Positioning System, or more commonly: GPS. It would be difficult to overstate how useful I find my GPS unit. It's worth getting one for no other reason than you will NEVER have to ask anyone for directions--you will never be lost again.

At a minimum, the simplest GPS units will give you the latitude & longitude of your current location. However, nearly any GPS unit you buy today will provide much more information including:
  • your position overlaid on a map
  • pre-planned routes (highlighted roads) to your destination
  • "bread crumbs" or tracks (highlighted path) from your starting point
  • your speed, distance, estimated time to destination
  • and all manner of other data like average moving speed, average overall speed, time of sunrise, etc.
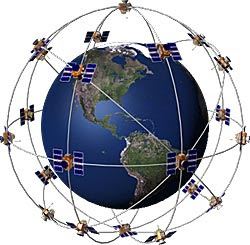
The US Department of Defense created the 24 satellite constellation in the late 1970s that makes up the NAVSTAR global positioning system. These satellites transmit coded signals down to earth which are received by a GPS unit. This is why a GPS unit needs to have a view of the sky--it will not work indoors.

Determining position is computationally intense--today's GPS units are essentially small, hand-held computers--but conceptually simple. To determine position, the GPS unit measures the time it takes to receive the signal, which is traveling the speed of light, from at least two satellites. Triangulation of these two measurements provides your position on the ground. Using the timing data from a third satellite, the GPS unit can determine your altitude. Thus, with at least 3 satellites, your GPS unit can determine your 3-dimensional position anywhere on the planet.


The NAVSTAR GPS was intended for use by the US military. Since each satellite transmits its coded signal without regard to where it is pointing on the earth, anyone with a GPS receiver can collect it. To reduce its utility to nonmilitary receivers, an "error" component was incorporated in the coded signal that limited accuracy to about 300-ft for all except US military GPS units.

In 1983, President Reagan issued a directive that the NAVSTAR satellite signals could be freely used for civilian applications. The Federal Aviation Administration (FAA) embarked on an effort to employ GPS for use with commercial airlines and was working on an ingenious technique to markedly increase its accuracy. (Note the irony: 1 part of the US gov't was trying to circumvent the efforts of another part of the US gov't.) In 2000, President Clinton issued a directive that the error component of the GPS signal be shut off. Immediately, all existing GPS units were accurate to about 50-ft.

Since then, a technique known as differential GPS, DGPS, has been implemented which provides position accuracy down to about 12-ft. DGPS is used in all current commercial GPS units. Another technique known as wide area augmentation system (WAAS), based on the work of the FAA, provides accuracy down to less than 10-ft.

The number of GPS units available today is considerable. The FCC required all cell phones built since 2005 to have built in GPS so the phone can be located during an emergency 911 call. With GPS, these phones can have a multitude of other uses including cell phone tracking (keep track of the whereabouts of your child) to providing location based information like directions to a chosen destination. Currently, GPS units come in a myriad of shapes and sizes for use with all sorts of other equipment including portable hand held units, larger units to be mounted in vehicles, and others combined with computers and cameras.

The GPS unit I use for motorcycle rides is the Garmin Zumo 450. The Zumo GPS is specifically designed for use on motorcycles: it is waterproof, has large buttons and a touch screen for use with gloved hands, and hardened against vibration.
Garmin Zumo 450 Motorcycle GPS Navigator

The image below shows the track of several cross country motorcycle rides I've made in the last few years overlaid on Google Earth. In a subsequent post, I'll detail how to make these overlays.


Tuesday, November 6, 2007

Computer totaled?

It appears my computer crash is a bit more serious than I originally thought. My hard drives are intact (it had 2)--so thankfully I haven't lost any data. I'm making data back-ups now.

I'm writing this post using a laptop, which is not my favorite form factor for computers. Not having a desktop negatively impacts my posting frequency. But I will endeavor to persevere.


I've got a posting in the works on using GPS when riding. Heads up.

Tuesday, October 30, 2007

A computer crash is no motorcycle crash, but...

...it's still no fun. My primary computer, a Windows machine, is showing blue screen. I'm not 100% certain yet, but I think the hardware is ok. I believe I'm having problems with ntfs.sys. My problem is that I can't find a way to boot the computer--no matter what changes I make to the setup, I can't get it to boot from a live CD in the CD-ROM drive.

Alas, this will occupy my free time for the foreseeable future and will impact my posting frequency.

Wish me luck.

Thursday, October 25, 2007

Highway hypnosis...time for a vacation?

I had an occurrence a few days ago while commuting to work on my motorcycle: highway hypnosis or automaticity. I recall catching a green light on a heavily traveled highway on my way to work and then had the sensation of "waking up" some 8 miles further down the road. I cannot recall passing any of the intervening landmarks or any other details like the amount of traffic on the road--which, no doubt, was heavy as I was in the midst of the morning rush hour. After this happened, it seemed right to find a spot to pull off and take a few deep breaths.

You may have had such an experience. While driving you suddenly realize you cannot recall the last several minutes on the road, or you may not remember anything after passing some point. I have had this experience in automobiles several times but never before while riding.

This experience is scary enough on four wheels, but is downright chilling when on two. Riding a motorcycle requires constant alertness and it's best to assume every car you can see is trying to run you over (click for my Tips on Riding post). Regularly, I have to dodge autos driven by myopic drivers that cross my path intentionally or by mistake. This requires vigilance paying attention to cars and circumstances trying to anticipate the possibilities of close encounters. It is difficult to imagine doing this successfully when zoned out in some hypnotic state. Riding on two wheels, even driving on four, is no place to be on autopilot.

Despite riding several times since this event, without zoning out I might add, I've decided I need a vacation.

Friday, October 19, 2007

Getting Experience Riding Your Motorcycle

Ride.
Ride on straight roads.
Ride on twisty roads.
Ride slow.
Ride fast.
Put miles on your bike.
The best way to get experience riding a motorcycle is to ride a motorcycle.

But don't ride beyond your comfort zone. Initially, stay on familiar roads at moderate speeds until your are throughly accustomed to your motorcycle. My advice is to ride alone, vice riding in a group with other motorcyclists, at least initially. Do this until you have achieved a level of familiarity where you don't have to be conscious about shifting, braking, or any of the other mechanics of riding. When riding in a group, many riders and especially new ones, feel peer pressure to "keep up" with other, more experienced riders. Keeping up can tempt new riders to ride beyond their capabilities and possibly make a mistake. Avoid this. Ride alone until you've gained experience.


As you gain experience, concentrate on several aspects of riding:
  • Be smooth.
    Concentrate on clutch, shift, and throttle so that each up shift is so smooth that the only way you can tell you've shifted gears is aurally. You won't do this every time, and it's nearly impossible when you're accelerating briskly. But when you're not in a hurry and out of traffic where you can concentrate on your riding skills, be smooth.
  • Exercise throttle control.
    Related to the above, consciously practice opening and closing the throttle in controlled, smooth, movements. Avoid snapping the throttle open. Avoid slamming the throttle closed.
  • Be balanced.
    God's laws of physics ensures neophyte riders can keep a motorcycle upright at speed. The gyroscopic effects of the rotating tires provides stability at speed. An easy way to differentiate new riders from experienced is to watch them start off from a stop light. An experience rider has both feet on the pegs nearly as soon as the bike begins to move. A new rider will "walk" his bike with both feet for several yards before putting them on the pegs. The next time you're at a stop light, watch a motorcyclist and determine whether he is a new or experienced rider.


Check out these books on motorcycle riding from Amazon.com

Tuesday, October 16, 2007

How to be a Good Motorcycle Passenger

Riding as a passenger on a motorcycle can be thrilling and enjoyable. To ensure you aren't a hindrance to the rider, there are a few rules to keep in mind. These rules are important. As passenger, you don't want to be the reason the two of you go down. Here they are in order of precedence:
  1. Never take your feet off the foot pegs.
  2. Never take your feet off the foot pegs.
  3. See 2.
  4. Lean with the rider in turns.
  5. Minimize body movements.
It would be difficult to over emphasize how important it is to keep your feet on the pegs. If you must move them, let the rider know first. This rule applies whether your cruising or stopped. Depending on your size and the weight of the bike, an unexpected leg extension can upset the balance even while stopped at a light--nothing is more embarrassing than to drop a bike at a stoplight.

Leaning with the rider in turns is the next most important rule. Not leaning with the rider can severely effect the dynamics of a single track vehicle in a turn--enough to possibly cause the rider to lose control and you both go down.

How much to lean? I've read heard advice like keeping your inside shoulder (left shoulder for left turns, right shoulder for right turns) aligned with the rider's outside shoulder. Effectively, you as passenger will have your head looking over the rider's right shoulder when leaning left and vice versa.

In my opinion, this can be a bit confusing. Very simply: lean with the rider. Don't lean further, don't lean less.

Rule 5 is a variant of Rule 3. Always let the rider know if you need to move around on the bike. Small movements are fine, but if you need to shift your seating or stretch your arms, tap the rider first.

There's no lack of information on how to ride as a motorcycle passenger. Consider this blog entry to be a bare minimum (but it's enough). Check out other links with much more detailed information.
Here's three:
Click for a Google search to find more helpful advice.

A tip: Make sure the rider is ready before mounting or dismounting. Unexpectedly having your weight on one side of the motorcycle can easily cause it to fall over. The rider is likely never to ask you to ride again :(

A last bit of advice: don't ride as a passenger with a newbie rider. Neither of you will have any fun.

Monday, October 15, 2007

Learning to Ride

The mechanics of riding a motorcycle is like doing most things: at first new and possibly intimidating, but eventually routine and accomplished unconsciously. This is a short essay on the mechanics--the how to do it--of riding a motorcycle based on several decades of experience encompassing all aspects of street riding including commuting in high density metropolitan areas to road trips on infrequently used rural back roads. I also refer you to my riding tips blog entry that you might find interesting.

Step 1 - Learn to ride a bicycle.
If you don't know how to ride a bicycle, starting with a motorcycle is not recommended. Learn to ride a bike. Balance and turning on a single track vehicle is the same regardless of whether it is engine powered or pedal powered.

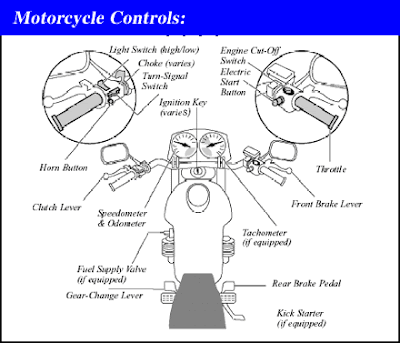
Step 2 - Motorcycle controls.
The hand and foot controls are the same for all motorcycles built since 1975. Count this as an advantage. Some older motorcycles, especially those from Britain, had the gear shift location and shift pattern opposite than other bikes and keeping mental track of this was, at least for me, a herculean task.


The sketch above can, at first, appear busy and therefore intimidating. So, let's focus on those controls associated with riding and leave the others for later.
Specifically, the hand and foot controls:
  • left hand lever operates the clutch
  • left foot lever shifts gears
  • right hand lever operates the front brake
  • right foot lever operates the rear brake
  • right hand grip operates the (twist) throttle


An aside:
Operating a clutch.
Knowing how a clutch works will greatly facilitate your learning to ride a motorcycle if you don't already have experience driving a car with a manual transmission. If you know how to use a manual transmission, skip down.

Sequential shifting.
(The following description is correct for almost all motorcycles. The most common exception will be motorcycles with 4 or 6 speed transmissions.)
Motorcycle transmissions use sequential shifting operated by the left foot. The shift pattern is "1 down, 4 up". This means first gear is engaged by pressing the shift lever down with your toe. Second is engaged by placing your toe under the lever and lifting up. Lift up again for third. Fourth and fifth gear are done the same way.

To down shift, do the opposite: Press the shift lever down with your toe to go from 5th to 4th, press again to 3rd, again to 2nd, and once more for 1st.

Neutral is located "half-way" between first and second. This can be confusing at first and some bikes are particularly difficult to find neutral requiring rocking back and forth at a stop or shifting to neutral before stopping--you'll learn the idiosyncrasies of finding neutral on your bike soon enough.


Step 3 - Riding.
Ride with your motorcycle-owning friend to an open parking lot. Stop the bike in a clear area and shut it off. Convince your friend to let you sit on the bike. Put both hands on the handle bars, leave the bike on its kick stand, and put both feet on the foot pegs. (Yes, you'll be leaning to the left.) Pull in on the clutch lever with your left hand. Do this several times to get the feel of engaging and disengaging the clutch.

If it feels like only Arnold Schwarzenegger can operate the clutch, then you're on the wrong bike. Find another motorcycle-owning friend and start over with this step.

You can try putting the bike in gear with your left foot, but this is uneventful unless the bike is running. So, give the owner $2 and ask him to buy a soda at 7-Eleven. After out of sight, pull the bike up and raise the kick stand, turn the key, press the starter button, and blip the throttle (biker speak for 'turn quickly') no more than about 1/8th of a turn. Blipping the throttle doesn't help you put it in gear, but it sounds cool.

Pull in the clutch, support the bike by leaning a bit on your right foot, raise your left foot to the foot peg and press the gear shift lever down into first. You'll feel the bike lurch and hear it "clunk." Put both feet on the ground. Slowly (s-l-o-w-l-y) let the clutch lever out (disengage the clutch) until you feel the bike just beginning to move. Pull the clutch back in (engage the clutch). Do this several times until you can anticipate, based on the clutch lever position, when it just begins to engage.

With both feet on the ground, slowly let the clutch out. Just before the clutch begins to engage, twist the throttle slowly and no more than about 1/8 of a turn just as you did when you were looking cool. Continue to engage (let out) the clutch as you turn the throttle keeping your feet out as "out riggers." Never letting go of the clutch lever, let the bike inch forward a foot or so and pull the clutch back in completely and gently squeeze the front brake (right lever) until the bike stops.

After doing this several times, stop the bike, turn the key to off. Extend the kick stand and carefully lower the bike on it. Dismount the bike and give yourself a hand. You just rode a motorcycle.


Step 4 - Practice.
Repeat step 3 until you are moving further and fast enough to confidently raise both feet to the foot pegs. Do not try to do too much too soon. Several small successes are more important than a large one.

Do not ride on the street until you are completely comfortable and confident. Riding on the street requires complete concentration on road conditions and safety, your focus should be on these things and not the mechanics of riding. You want to be able to confidently ride the bike in the parking lot shifting the gears both up and down, braking, and turning. Only after mastering these steps are you ready for the street.


Monday, October 8, 2007

Oct 2007 Ride to the Flight 93 Memorial


In early October, my wife and I, along with two of our closest friends, made plans to visit the Flight 93 Memorial Site in Shanksville, PA. We planned to leave Friday heading northwest to Cumberland, MD to stay the evening and then north to the Memorial Site on Saturday. Afterwards, we would head back home planning to get in by early evening on Saturday.

We had hoped to be on the road by 3pm, which even at a leisurely pace, would have got us to the hotel before 7pm. Unfortunately, we were not able to leave until closer to 5pm and rode about half of the way in the dark. Despite this, the ride was nice as the weather was unseasonably warm and we were able to escape the traffic once off of Rte 50. As we rode up and over the Blue Ridge, we had to keep a keen eye for deer and saw many on the way. We rolled into the Best Western in LaVale at around 9pm.


The route to the hotel.

View Larger Map


The next morning we woke to an overcast sky that was a bit cool and damp. But the previous week told us this would burn away to sunshine with hot and humid temps--and it did.
We made a short excursion west to see the partially built Noah's Ark just south of Frostburg, MD. (I took particular notice of the fact that steel I-beams are being used to frame the Ark...something I'm pretty sure Noah didn't do.) From there we went due north to Shanksville.

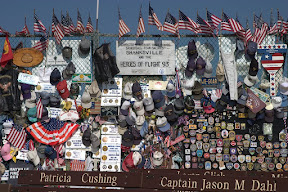
It's difficult not to be emotional at the Memorial Site thinking about the bravery of the passengers and crew of Flight 93. The site is touching in its simplicity and worth a trip to see.


The route from the hotel to the Flight 93 Memorial.

View Larger Map


We originally intended to see some of the off beat, unusual sights in PA (Tiny World, Shoe House, and a reconstruction of the Temple and Ark of the Covenant), but decided instead to stop at a covered bridge we passed while on the way to the Memorial Site.


Memorial Site to covered bridge.

View Larger Map

From the bridge, we opted to head back by first going away from home to the northwest on Rte 30 and then turning south past Frank Lloyd Wright's Fallingwater ultimately back to Rte 50 before we turned east for home. This had us going back across the mountains later than intended. To expedite getting home, we opted to take the interstate from Winchester making a high speed run in the dark. By the time we got in, we had been on the road for 12 hours.

Covered bridge to home...sorta.

View Larger Map

The three ladies were tough, sticking it out for the full day still with smiles and no complaints. My wife wrestled her trike up and down mountains with aplomb (twisty roads require significantly more physical strength on 3 wheels than on 2). Better riding companions don't exist.

We logged the following stats on this trip:

  • Total miles: 490
  • Average speed: 32 mph
  • Moving average: 43 mph
  • Max speed: 85 mph (whoops!)