Several years ago I was talking with a venerable motorcyclist about memorable rides. During the discussion, he opened his top box and pulled out a Rand McNally road atlas turning to the page showing the entire United States. On this map he had highlighted in yellow every road he had ridden in the last year. He was proud, and rightly so, of the amount of yellow on the map.
Rand McNally 2008 the road atlas, United States | Canada | Mexico
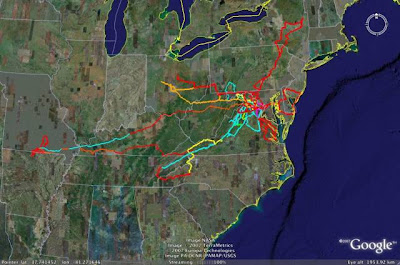
This motivated me to do the same using my GPS and Google Earth. Here's an example of some of the rides I took in 2006 & 2007:
Recording your track with GPS
All GPS units I've worked with can be put into a mode to record position information (latitude & longitude). Most will record other data including altitude (giving 3-dimensional position), speed, compass direction, etc. These data can be saved as a file (document) on your computer for further processing.
To use this feature on most GPS units is as simple as turning it on--read the manual for how. The important setting for this mode is how often to capture the position data. You want to record often enough to create a smooth track of where you've been, but not so often that the position file grows to ungainly size. For long, multi-day trips, the file can be very large. It's important to watch this and download the data to a computer or memory card (a feature of some GPS units) to keep the unit from overwriting earlier data when its memory gets full.
Viewing track data in Google Earth
If you haven't used Google Earth, you don't know what you're missing. Untold hours can be spent looking at your home, your neighbor's home, your city, your state, other states, other countries, etc., etc. If your computer has the horsepower and you've got a high speed internet connection, you owe yourself this free program from Google.
To use GE to view your track data, you must transform the GPS position information into what is called 'KML format' (GE can also read data in the compressed KMZ format). First determine whether the software that comes with your GPS unit will save data in KML format. If it does, you're set. If it doesn't, you need a converter.
I have had excellent results with the GPS data converter program GPS Babel. (You'll need to download & install this program. It is 'support ware'--the software is free using the GNU license; the developers request donations. Note that this program runs on many platforms including the Mac...they deserve a donation!) My Zumo outputs position data using the GPX format. With GPSBabel and a couple of mouse clicks I have a KML file ready to be read by Google Earth. It's that easy.
If you find GPS Babel a bit daunting, check out the web services at GPS Visualizer for converting GPS data. There is a KML converter at the site that accepts GPS data in a pre-defined format. There is another page that provides a web interface for GPS Babel so you can convert GPS data without having to download the GPS Babel program.
In GE you can change the width of your track, make it semi-transparent, change the color, etc. You can also add photos taken along the way. GE can be a platform for recording your memorable rides and sharing with your friends and family.
Have fun!
No comments:
Post a Comment