Saturday, December 22, 2007

Motorcycling in the winter

If you've ridden a motorcycle when the air temperature is below 40o, then you know how cold it can be to ride. According to the National Weather Service, if the air temperature is 40o and your traveling at 50-mph, then the temperature you feel is 25o. When it's 25o, at 50-mph it feels like 4o.

Riding without the proper gear at these temperatures is not only uncomfortable, but it can be dangerous:
  • Fingers get numb and it becomes hard to operate hand controls.
  • Toes get numb and it's difficult to operate foot controls.
  • Eyes will begin to tear when cold and visibility can be impaired.
  • Mental focus is directed away from traffic conditions and concentrates on trying to keep the body warm.
So, what are some tips for riding safely when it's cold outside?
  • Get a full length riding suit that will insulate the body from the cold wind. I wear a two piece Kevlar based textile suit with padding. While expensive, these suits will last years with minimal care. Mine is 7 years old.
  • Wear full face helmet. Keeping the cold wind off of your face is important. If not a full face helmet, then protect your face with a balaclava. Even the light weight ones can be effective by keeping your warm breath close to your face.
  • When the air temperatures get into the low 20s and teens, then, at least for me, heated gloves are in order. Keeping my fingers warm is most difficult for me and can make for a a very uncomfortable ride. When warm, even cold rides are tolerable for me.
  • If especially cold &/or I plan to take a long ride, then I don my heated socks and heated vest.
This gear can get expensive, but when riding in the cold, you'll agree it's worth every penny.

Friday, December 14, 2007

Riding to work on Dec 14th

39o
Heavy fog, visibility down to 100-yds in some places.
Sun promised in the afternoon.
Significant nor'easter with snow expected in 24-hrs.
Ride On!

Sunday, December 2, 2007

Bike to bike communications--what doesn't work

This is more of a solicitation from readers to learn what works best for bike-to-bike communications than it is a blog post per se. A victim of trying to find the "cheap way out", I have yet to come across a viable bike-to-bike communications system for use with open face helmets.

From first hand experience, here's what I know does NOT work:
  • FRS radios with available ear bud & VOX mic
  • FRS radios with available ear bud & PTT mic
  • GMRS radios with ear bud & VOX or PTT mic
  • GMRS radios with throat mic & corresponding ear piece
I have not pursued finding a solution with any vigor. Any suggestions greatly appreciated.

Thursday, November 29, 2007

Winterizing your motorcycle below the 38th parallel

How do I winterize my motorcycles?
I don't. Winter in the Washington metro area (~38th parallel) will have enough occasional ridable days that I keep my bike ready to go. The extended winterizing procedures required for folks living where winter is more severe are sufficiently drastic that I probably wouldn't want to take my bike out of hibernation just for one day. So, I don't do the full up winterizing.

The closest I come to winterizing is attaching a Deltran Battery Tender "smart" battery charger. Keeping your battery charged is important because lead-acid batteries can lose as much as half of its voltage through self discharge during the 3 or 4 months of winter disuse. If your bike is parked longer, or in the weather, then an unattended battery completely discharging is not uncommon, especially for casually ridden bikes during their second winter. The Deltran charger, and other "smart chargers", will not overcharge your battery because of built in circuitry to reduce or shut off the charger depending on the voltage of the battery. It's beauty is that you can connect it to your battery and literally forget about it. I keep a quick disconnect (it comes with the Deltran) on the battery at all times with the connector peeking out from under my seat. This makes it very convenient to connect the charger.

The only other step I sometimes take is using fuel stabilizer if it looks like a long cold spell is going to keep me from riding. I'd rather take this, probably overkill, precaution than to have to deal with crudded up fuel lines and carbs or injectors. I pour the requisite amount into the tank, then start my bike and let it run for a few minutes to ensure the stabilized fuel is throughout the entire fuel system.

Keep on riding!


Tuesday, November 20, 2007

GPS Part 3 -- How to create GPS tracks for Google Earth

The GPS Part 2 post discussed how to use a GPS unit for pre-trip planning. This post will focus on using a GPS unit for post-trip recording, specifically, how to create a record of your trip in Google Earth.

Several years ago I was talking with a venerable motorcyclist about memorable rides. During the discussion, he opened his top box and pulled out a Rand McNally road atlas turning to the page showing the entire United States. On this map he had highlighted in yellow every road he had ridden in the last year. He was proud, and rightly so, of the amount of yellow on the map.
Rand McNally 2008 the road atlas, United States | Canada | Mexico

This motivated me to do the same using my GPS and Google Earth. Here's an example of some of the rides I took in 2006 & 2007:


Recording your track with GPS
All GPS units I've worked with can be put into a mode to record position information (latitude & longitude). Most will record other data including altitude (giving 3-dimensional position), speed, compass direction, etc. These data can be saved as a file (document) on your computer for further processing.

To use this feature on most GPS units is as simple as turning it on--read the manual for how. The important setting for this mode is how often to capture the position data. You want to record often enough to create a smooth track of where you've been, but not so often that the position file grows to ungainly size. For long, multi-day trips, the file can be very large. It's important to watch this and download the data to a computer or memory card (a feature of some GPS units) to keep the unit from overwriting earlier data when its memory gets full.

Viewing track data in Google Earth
If you haven't used Google Earth, you don't know what you're missing. Untold hours can be spent looking at your home, your neighbor's home, your city, your state, other states, other countries, etc., etc. If your computer has the horsepower and you've got a high speed internet connection, you owe yourself this free program from Google.

To use GE to view your track data, you must transform the GPS position information into what is called 'KML format' (GE can also read data in the compressed KMZ format). First determine whether the software that comes with your GPS unit will save data in KML format. If it does, you're set. If it doesn't, you need a converter.

I have had excellent results with the GPS data converter program GPS Babel. (You'll need to download & install this program. It is 'support ware'--the software is free using the GNU license; the developers request donations. Note that this program runs on many platforms including the Mac...they deserve a donation!) My Zumo outputs position data using the GPX format. With GPSBabel and a couple of mouse clicks I have a KML file ready to be read by Google Earth. It's that easy.

If you find GPS Babel a bit daunting, check out the web services at GPS Visualizer for converting GPS data. There is a KML converter at the site that accepts GPS data in a pre-defined format. There is another page that provides a web interface for GPS Babel so you can convert GPS data without having to download the GPS Babel program.

In GE you can change the width of your track, make it semi-transparent, change the color, etc. You can also add photos taken along the way. GE can be a platform for recording your memorable rides and sharing with your friends and family.

Have fun!


Sunday, November 18, 2007

GPS Part 2 -- How to create GPS routes

As promised in my previous post on GPS units, this posting describes how to use a GPS for more than watching yourself travel along on a map.

Using your GPS for routing
One of the most useful features of GPS units is its ability to display a route from your starting point to your destination. The latest units give you turn-by-turn directions with many even "speaking" the directions. Route planning allows you to spend time considering how you want to get to your destination if the shortest or quickest way is not the goal. For many motorcycle rides, how you get there is just as important as arriving.

Routes in real time
The simplest way to create a route for most GPS units is to enter a destination address and let the unit determine the "best" route automatically. Most GPS units use a version of Dijkstra's algorithm for finding the shortest path from one point to another. I generally use the built-in routing function when I need to quickly get from point A to point B without much regard to how I get there. For most of my motorcycle trips, the calculated "best" route is generally not the route I want to take.

Routes using software that came with your unit
When you want to travel a specific route, for example along a scenic highway or to stay off the interstate, you need to manually create the route. Generally, the easiest way to do this is to use the software that comes with your GPS unit. Basically, you will put the mapping program into "route mode", then click points along your desired route from start to destination. The specific steps will depend on your particular mapping program. When finished, connect your GPS unit to your computer (typically via USB), and click the transfer button to download the route to your unit. When you're ready to navigate, choose this downloaded route in lieu of letting the unit calculate a route.

Routes using the web
If you've been reading this blog, you know I suffered a computer crash that turned out to be more serious than a dead hard drive. This computer was a Windows XP machine so software like Garmin's MapSource and a myriad of other applications for mapping worked without a hitch. I haven't personally done extensive research, but based on information from various podcasts and web sites, it appears most GPS manufactures only provide Windows compatible software.

Presently, I'm conducting an experiment to see if I can function with minimal aggravation using a Mac running OS X. A self imposed restriction in this experiment is to avoid purchasing software. This has directed my focus to the web, and so far, I've had interesting results. As I become more experienced in the various tools, I will provide updates through subsequent blog postings.
Apple MacBook Pro MA896LL/A 15" Notebook PC (2.4 GHz Intel Core 2 Duo, 2 GB RAM, 160 GB Hard Drive, DVD/CD SuperDrive)


An aside:
Bookmark GPS Visualizer. There's much info here that I haven't fully digested. It's likely that most of what you want to do with a GPS can be done from this web site.


My Garmin Zumo ingests route, waypoint, and tracking data in GPX format. (This is interesting since Garmin has its own proprietary data format.) So, I investigated web services that output route data using GPX.

I very much like Google maps. It is easy to enter a starting point and a destination and have Google maps determine a route. You can click the 'Avoid highways' option which keeps the route off of the interstate. Further, you can click and drag the route to other roads or intervening destinations if desired. In short, you can easily create a custom route from start to destination. Google maps also provide turn-by-turn directions and calculate the overall mileage and estimate the travel time. Because of its ease of use, Google maps is an integral part of my motorcycle trips planning.

So, an ideal, no cost solution for my Mac is to have some utility that will take the Google maps route data and output a GPX formatted file. Kudos to the author of the Communications From Elsewhere blog who has created a Google maps to GPX converter.

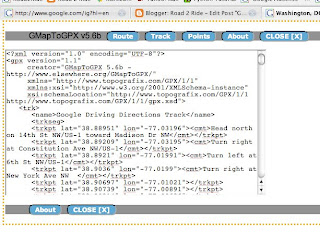
To use it, you need to bookmark the GMapToGPX 'bookmarklet' found at the site. Then go to Google maps and create your route. Click the bookmarklet. A new page is generated with the route data in GPX format ready for cut & paste into any text editor. Transfer this file to your GPS unit and you're good to go. I've found that clicking each option button so they read "Route Track Points" provides me with the best output for my GPS unit. Experiment to see what works best for you. Note, there's no reason you can't use this with your Windows or Linux based computer.

An example of directions provided by Google maps from Washington DC to Manhattan:

View Larger Map

After a couple of drag & drops, a more scenic route along the east coast:

View Larger Map

Here's what the GMapToGPX bookmarklet provides when clicked. Cut the text from the window and paste into any text editor. Save as a plain text file. Then transfer it to your GPS unit.


Good luck!
Post comments if you find this useful.

Friday, November 9, 2007

GPS Part 1 -- Don't leave home without it

Unless you've been living under a rock, you've likely heard of the Global Positioning System, or more commonly: GPS. It would be difficult to overstate how useful I find my GPS unit. It's worth getting one for no other reason than you will NEVER have to ask anyone for directions--you will never be lost again.

At a minimum, the simplest GPS units will give you the latitude & longitude of your current location. However, nearly any GPS unit you buy today will provide much more information including:
  • your position overlaid on a map
  • pre-planned routes (highlighted roads) to your destination
  • "bread crumbs" or tracks (highlighted path) from your starting point
  • your speed, distance, estimated time to destination
  • and all manner of other data like average moving speed, average overall speed, time of sunrise, etc.
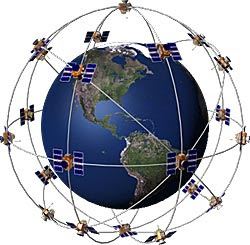
The US Department of Defense created the 24 satellite constellation in the late 1970s that makes up the NAVSTAR global positioning system. These satellites transmit coded signals down to earth which are received by a GPS unit. This is why a GPS unit needs to have a view of the sky--it will not work indoors.

Determining position is computationally intense--today's GPS units are essentially small, hand-held computers--but conceptually simple. To determine position, the GPS unit measures the time it takes to receive the signal, which is traveling the speed of light, from at least two satellites. Triangulation of these two measurements provides your position on the ground. Using the timing data from a third satellite, the GPS unit can determine your altitude. Thus, with at least 3 satellites, your GPS unit can determine your 3-dimensional position anywhere on the planet.


The NAVSTAR GPS was intended for use by the US military. Since each satellite transmits its coded signal without regard to where it is pointing on the earth, anyone with a GPS receiver can collect it. To reduce its utility to nonmilitary receivers, an "error" component was incorporated in the coded signal that limited accuracy to about 300-ft for all except US military GPS units.

In 1983, President Reagan issued a directive that the NAVSTAR satellite signals could be freely used for civilian applications. The Federal Aviation Administration (FAA) embarked on an effort to employ GPS for use with commercial airlines and was working on an ingenious technique to markedly increase its accuracy. (Note the irony: 1 part of the US gov't was trying to circumvent the efforts of another part of the US gov't.) In 2000, President Clinton issued a directive that the error component of the GPS signal be shut off. Immediately, all existing GPS units were accurate to about 50-ft.

Since then, a technique known as differential GPS, DGPS, has been implemented which provides position accuracy down to about 12-ft. DGPS is used in all current commercial GPS units. Another technique known as wide area augmentation system (WAAS), based on the work of the FAA, provides accuracy down to less than 10-ft.

The number of GPS units available today is considerable. The FCC required all cell phones built since 2005 to have built in GPS so the phone can be located during an emergency 911 call. With GPS, these phones can have a multitude of other uses including cell phone tracking (keep track of the whereabouts of your child) to providing location based information like directions to a chosen destination. Currently, GPS units come in a myriad of shapes and sizes for use with all sorts of other equipment including portable hand held units, larger units to be mounted in vehicles, and others combined with computers and cameras.

The GPS unit I use for motorcycle rides is the Garmin Zumo 450. The Zumo GPS is specifically designed for use on motorcycles: it is waterproof, has large buttons and a touch screen for use with gloved hands, and hardened against vibration.
Garmin Zumo 450 Motorcycle GPS Navigator

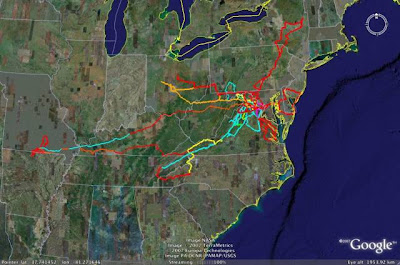
The image below shows the track of several cross country motorcycle rides I've made in the last few years overlaid on Google Earth. In a subsequent post, I'll detail how to make these overlays.


Tuesday, November 6, 2007

Computer totaled?

It appears my computer crash is a bit more serious than I originally thought. My hard drives are intact (it had 2)--so thankfully I haven't lost any data. I'm making data back-ups now.

I'm writing this post using a laptop, which is not my favorite form factor for computers. Not having a desktop negatively impacts my posting frequency. But I will endeavor to persevere.


I've got a posting in the works on using GPS when riding. Heads up.

Tuesday, October 30, 2007

A computer crash is no motorcycle crash, but...

...it's still no fun. My primary computer, a Windows machine, is showing blue screen. I'm not 100% certain yet, but I think the hardware is ok. I believe I'm having problems with ntfs.sys. My problem is that I can't find a way to boot the computer--no matter what changes I make to the setup, I can't get it to boot from a live CD in the CD-ROM drive.

Alas, this will occupy my free time for the foreseeable future and will impact my posting frequency.

Wish me luck.

Thursday, October 25, 2007

Highway hypnosis...time for a vacation?

I had an occurrence a few days ago while commuting to work on my motorcycle: highway hypnosis or automaticity. I recall catching a green light on a heavily traveled highway on my way to work and then had the sensation of "waking up" some 8 miles further down the road. I cannot recall passing any of the intervening landmarks or any other details like the amount of traffic on the road--which, no doubt, was heavy as I was in the midst of the morning rush hour. After this happened, it seemed right to find a spot to pull off and take a few deep breaths.

You may have had such an experience. While driving you suddenly realize you cannot recall the last several minutes on the road, or you may not remember anything after passing some point. I have had this experience in automobiles several times but never before while riding.

This experience is scary enough on four wheels, but is downright chilling when on two. Riding a motorcycle requires constant alertness and it's best to assume every car you can see is trying to run you over (click for my Tips on Riding post). Regularly, I have to dodge autos driven by myopic drivers that cross my path intentionally or by mistake. This requires vigilance paying attention to cars and circumstances trying to anticipate the possibilities of close encounters. It is difficult to imagine doing this successfully when zoned out in some hypnotic state. Riding on two wheels, even driving on four, is no place to be on autopilot.

Despite riding several times since this event, without zoning out I might add, I've decided I need a vacation.

Friday, October 19, 2007

Getting Experience Riding Your Motorcycle

Ride.
Ride on straight roads.
Ride on twisty roads.
Ride slow.
Ride fast.
Put miles on your bike.
The best way to get experience riding a motorcycle is to ride a motorcycle.

But don't ride beyond your comfort zone. Initially, stay on familiar roads at moderate speeds until your are throughly accustomed to your motorcycle. My advice is to ride alone, vice riding in a group with other motorcyclists, at least initially. Do this until you have achieved a level of familiarity where you don't have to be conscious about shifting, braking, or any of the other mechanics of riding. When riding in a group, many riders and especially new ones, feel peer pressure to "keep up" with other, more experienced riders. Keeping up can tempt new riders to ride beyond their capabilities and possibly make a mistake. Avoid this. Ride alone until you've gained experience.


As you gain experience, concentrate on several aspects of riding:
  • Be smooth.
    Concentrate on clutch, shift, and throttle so that each up shift is so smooth that the only way you can tell you've shifted gears is aurally. You won't do this every time, and it's nearly impossible when you're accelerating briskly. But when you're not in a hurry and out of traffic where you can concentrate on your riding skills, be smooth.
  • Exercise throttle control.
    Related to the above, consciously practice opening and closing the throttle in controlled, smooth, movements. Avoid snapping the throttle open. Avoid slamming the throttle closed.
  • Be balanced.
    God's laws of physics ensures neophyte riders can keep a motorcycle upright at speed. The gyroscopic effects of the rotating tires provides stability at speed. An easy way to differentiate new riders from experienced is to watch them start off from a stop light. An experience rider has both feet on the pegs nearly as soon as the bike begins to move. A new rider will "walk" his bike with both feet for several yards before putting them on the pegs. The next time you're at a stop light, watch a motorcyclist and determine whether he is a new or experienced rider.


Check out these books on motorcycle riding from Amazon.com

Tuesday, October 16, 2007

How to be a Good Motorcycle Passenger

Riding as a passenger on a motorcycle can be thrilling and enjoyable. To ensure you aren't a hindrance to the rider, there are a few rules to keep in mind. These rules are important. As passenger, you don't want to be the reason the two of you go down. Here they are in order of precedence:
  1. Never take your feet off the foot pegs.
  2. Never take your feet off the foot pegs.
  3. See 2.
  4. Lean with the rider in turns.
  5. Minimize body movements.
It would be difficult to over emphasize how important it is to keep your feet on the pegs. If you must move them, let the rider know first. This rule applies whether your cruising or stopped. Depending on your size and the weight of the bike, an unexpected leg extension can upset the balance even while stopped at a light--nothing is more embarrassing than to drop a bike at a stoplight.

Leaning with the rider in turns is the next most important rule. Not leaning with the rider can severely effect the dynamics of a single track vehicle in a turn--enough to possibly cause the rider to lose control and you both go down.

How much to lean? I've read heard advice like keeping your inside shoulder (left shoulder for left turns, right shoulder for right turns) aligned with the rider's outside shoulder. Effectively, you as passenger will have your head looking over the rider's right shoulder when leaning left and vice versa.

In my opinion, this can be a bit confusing. Very simply: lean with the rider. Don't lean further, don't lean less.

Rule 5 is a variant of Rule 3. Always let the rider know if you need to move around on the bike. Small movements are fine, but if you need to shift your seating or stretch your arms, tap the rider first.

There's no lack of information on how to ride as a motorcycle passenger. Consider this blog entry to be a bare minimum (but it's enough). Check out other links with much more detailed information.
Here's three:
Click for a Google search to find more helpful advice.

A tip: Make sure the rider is ready before mounting or dismounting. Unexpectedly having your weight on one side of the motorcycle can easily cause it to fall over. The rider is likely never to ask you to ride again :(

A last bit of advice: don't ride as a passenger with a newbie rider. Neither of you will have any fun.

Monday, October 15, 2007

Learning to Ride

The mechanics of riding a motorcycle is like doing most things: at first new and possibly intimidating, but eventually routine and accomplished unconsciously. This is a short essay on the mechanics--the how to do it--of riding a motorcycle based on several decades of experience encompassing all aspects of street riding including commuting in high density metropolitan areas to road trips on infrequently used rural back roads. I also refer you to my riding tips blog entry that you might find interesting.

Step 1 - Learn to ride a bicycle.
If you don't know how to ride a bicycle, starting with a motorcycle is not recommended. Learn to ride a bike. Balance and turning on a single track vehicle is the same regardless of whether it is engine powered or pedal powered.

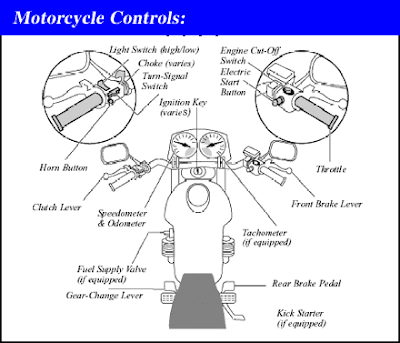
Step 2 - Motorcycle controls.
The hand and foot controls are the same for all motorcycles built since 1975. Count this as an advantage. Some older motorcycles, especially those from Britain, had the gear shift location and shift pattern opposite than other bikes and keeping mental track of this was, at least for me, a herculean task.


The sketch above can, at first, appear busy and therefore intimidating. So, let's focus on those controls associated with riding and leave the others for later.
Specifically, the hand and foot controls:
  • left hand lever operates the clutch
  • left foot lever shifts gears
  • right hand lever operates the front brake
  • right foot lever operates the rear brake
  • right hand grip operates the (twist) throttle


An aside:
Operating a clutch.
Knowing how a clutch works will greatly facilitate your learning to ride a motorcycle if you don't already have experience driving a car with a manual transmission. If you know how to use a manual transmission, skip down.

Sequential shifting.
(The following description is correct for almost all motorcycles. The most common exception will be motorcycles with 4 or 6 speed transmissions.)
Motorcycle transmissions use sequential shifting operated by the left foot. The shift pattern is "1 down, 4 up". This means first gear is engaged by pressing the shift lever down with your toe. Second is engaged by placing your toe under the lever and lifting up. Lift up again for third. Fourth and fifth gear are done the same way.

To down shift, do the opposite: Press the shift lever down with your toe to go from 5th to 4th, press again to 3rd, again to 2nd, and once more for 1st.

Neutral is located "half-way" between first and second. This can be confusing at first and some bikes are particularly difficult to find neutral requiring rocking back and forth at a stop or shifting to neutral before stopping--you'll learn the idiosyncrasies of finding neutral on your bike soon enough.


Step 3 - Riding.
Ride with your motorcycle-owning friend to an open parking lot. Stop the bike in a clear area and shut it off. Convince your friend to let you sit on the bike. Put both hands on the handle bars, leave the bike on its kick stand, and put both feet on the foot pegs. (Yes, you'll be leaning to the left.) Pull in on the clutch lever with your left hand. Do this several times to get the feel of engaging and disengaging the clutch.

If it feels like only Arnold Schwarzenegger can operate the clutch, then you're on the wrong bike. Find another motorcycle-owning friend and start over with this step.

You can try putting the bike in gear with your left foot, but this is uneventful unless the bike is running. So, give the owner $2 and ask him to buy a soda at 7-Eleven. After out of sight, pull the bike up and raise the kick stand, turn the key, press the starter button, and blip the throttle (biker speak for 'turn quickly') no more than about 1/8th of a turn. Blipping the throttle doesn't help you put it in gear, but it sounds cool.

Pull in the clutch, support the bike by leaning a bit on your right foot, raise your left foot to the foot peg and press the gear shift lever down into first. You'll feel the bike lurch and hear it "clunk." Put both feet on the ground. Slowly (s-l-o-w-l-y) let the clutch lever out (disengage the clutch) until you feel the bike just beginning to move. Pull the clutch back in (engage the clutch). Do this several times until you can anticipate, based on the clutch lever position, when it just begins to engage.

With both feet on the ground, slowly let the clutch out. Just before the clutch begins to engage, twist the throttle slowly and no more than about 1/8 of a turn just as you did when you were looking cool. Continue to engage (let out) the clutch as you turn the throttle keeping your feet out as "out riggers." Never letting go of the clutch lever, let the bike inch forward a foot or so and pull the clutch back in completely and gently squeeze the front brake (right lever) until the bike stops.

After doing this several times, stop the bike, turn the key to off. Extend the kick stand and carefully lower the bike on it. Dismount the bike and give yourself a hand. You just rode a motorcycle.


Step 4 - Practice.
Repeat step 3 until you are moving further and fast enough to confidently raise both feet to the foot pegs. Do not try to do too much too soon. Several small successes are more important than a large one.

Do not ride on the street until you are completely comfortable and confident. Riding on the street requires complete concentration on road conditions and safety, your focus should be on these things and not the mechanics of riding. You want to be able to confidently ride the bike in the parking lot shifting the gears both up and down, braking, and turning. Only after mastering these steps are you ready for the street.


Monday, October 8, 2007

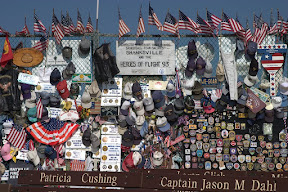
Oct 2007 Ride to the Flight 93 Memorial


In early October, my wife and I, along with two of our closest friends, made plans to visit the Flight 93 Memorial Site in Shanksville, PA. We planned to leave Friday heading northwest to Cumberland, MD to stay the evening and then north to the Memorial Site on Saturday. Afterwards, we would head back home planning to get in by early evening on Saturday.

We had hoped to be on the road by 3pm, which even at a leisurely pace, would have got us to the hotel before 7pm. Unfortunately, we were not able to leave until closer to 5pm and rode about half of the way in the dark. Despite this, the ride was nice as the weather was unseasonably warm and we were able to escape the traffic once off of Rte 50. As we rode up and over the Blue Ridge, we had to keep a keen eye for deer and saw many on the way. We rolled into the Best Western in LaVale at around 9pm.


The route to the hotel.

View Larger Map


The next morning we woke to an overcast sky that was a bit cool and damp. But the previous week told us this would burn away to sunshine with hot and humid temps--and it did.
We made a short excursion west to see the partially built Noah's Ark just south of Frostburg, MD. (I took particular notice of the fact that steel I-beams are being used to frame the Ark...something I'm pretty sure Noah didn't do.) From there we went due north to Shanksville.

It's difficult not to be emotional at the Memorial Site thinking about the bravery of the passengers and crew of Flight 93. The site is touching in its simplicity and worth a trip to see.


The route from the hotel to the Flight 93 Memorial.

View Larger Map


We originally intended to see some of the off beat, unusual sights in PA (Tiny World, Shoe House, and a reconstruction of the Temple and Ark of the Covenant), but decided instead to stop at a covered bridge we passed while on the way to the Memorial Site.


Memorial Site to covered bridge.

View Larger Map

From the bridge, we opted to head back by first going away from home to the northwest on Rte 30 and then turning south past Frank Lloyd Wright's Fallingwater ultimately back to Rte 50 before we turned east for home. This had us going back across the mountains later than intended. To expedite getting home, we opted to take the interstate from Winchester making a high speed run in the dark. By the time we got in, we had been on the road for 12 hours.

Covered bridge to home...sorta.

View Larger Map

The three ladies were tough, sticking it out for the full day still with smiles and no complaints. My wife wrestled her trike up and down mountains with aplomb (twisty roads require significantly more physical strength on 3 wheels than on 2). Better riding companions don't exist.

We logged the following stats on this trip:

  • Total miles: 490
  • Average speed: 32 mph
  • Moving average: 43 mph
  • Max speed: 85 mph (whoops!)

Sunday, September 30, 2007

2007 Trip to Oz

My wife and I with our riding companion took a 13 day trip from home to the Ozarks in Missouri. We planned to take 3 days to travel the 1000-miles from home to West Plains, MO maximizing the time spent on secondary roads. We traveled about 300 to 350 miles each day stopping for 15-min each hour. This pace, combined with generally dry weather and moderate temperatures made for a very easy ride there and back.

While there, we spent 7 days riding the roads in the Ozarks. A beautiful combination of good weather, winding roads, minimal auto traffic, and a general lack of local constabulary made for a perfect vacation.

Here's a map showing the local Oz riding we did for a week. Note, several tracks were ridden numerous times as we stopped to visit family, eat meals, and sight see.


Here's a Picasa (Google) Web album of the photos geo-coded to a map. Check it out.
Trip to Oz

Thursday, September 27, 2007

More details please

I've been asked to provide more details about the posted rides. Ok. I'll do my best to record details about the road, weather, places, people, and anything else of note.

Posts on rides already taken will continue to be succinct and are unlikely to include many details beyond the route (using Google Maps) and some photos. For some rides I'll include GPS data (lat, lon) for points of interest.

Thanks!
John the Rider Guy

Saturday, September 22, 2007

August 2005 Ride to Atlantic City

In August 2005, my wife rode her 2001 Goldwing Trike from home to Atlantic City with me as passenger. I forgot to record the mileage, but it was on the order of 500-miles. We combined some Interstate roads with byways; not having too many options when heading north from the Washington DC area and trying to make time due to a late day start. In any case, we had fun staying at the Sands Casino Hotel in Atlantic City and returned via the ferry from Delaware to Maryland. We spent two nights and three days on this trip. Check out the map below.

Here's some photos:


Arriving in Atlantic City at the Sands Casino Hotel.


This is one of the water towers south of Atlantic City. Nice.


Waiting for the Cape May-Lewes Ferry. What was it like when there were no cell phones?


On the Ferry pulling away from Cape May, Delaware.


The trike.


Anywhere, anytime, any how...my wife finds a way to make friends. Here's a couple of wild ones anxious to disembark the Ferry.


View Larger Map

9 Riding Tips

According to various sources including the National Highway Traffic Safety Administration (NHTSA), the typical motorcyclist rides less than 2000 miles per year--other sources indicate much less. Thus, most motorcyclists don't ride enough to develop good riding skills much less good riding-safety awareness.

Up until two years ago, I averaged more than 18,000 miles/year and in the last two my riding is down to 15,000 miles/year--so even using the low figure, I ride about 7 times more than most riders. So, what follows are 9 tips I've picked up that have helped me stay safe even when riding in the non-motorcycle friendly Washington DC metro area. I provide them here in the hopes that some of you may find them useful. If you're thinking of buying a motorcycle, please include these tips with the other safety information you're gathering.

In my priority order of importance:

  1. Take the Motorcycle Safety Foundation beginner's skills course.
  2. For the price of the course (a good investment IMHO), you get to ride someone else's bike (so don't worry about dropping it!) and learn a good deal about what it takes to ride safely on the street. Despite what you might hear, this is not a motorcycle familiarization class--if you don't know how to ride, don't assume you'll learn from this class. It's best to know riding basics before you take the class. Riding a motorcycle is not hard: if you know how to ride a bicycle, you're more than half ½ way there. Get someone willing to show you the motorcycle mechanics: the clutch, gears, brakes, throttle, etc. Find a large parking lot and practice riding. Riding a motorcycle is just like a lot of other things: 90% attitude & 10% mechanics. My then teenage son learned to first ride a motorcycle after about 10 minutes of instruction on a 625lb Honda American Classic Edition!
    Note: If you can't pass the MSF beginner's course, you should not ride a motorcycle.

  3. Assume every car you can see is trying to run you over.
  4. Not that they could run you over, or that they might run you over, but that they're trying to run you over. Never forget that even the smallest car is more than a 1000lbs heavier than the largest motorcycle. The laws of physics do not favor the motorcyclist in any sort of car / motorcycle encounter.

  5. Ride with your high-beam on during the day.
  6. The intent is to be seen. Riding with your headlight high beam on may irritate some drivers, but at least they see you!
    Legal disclaimer: Driving with your high beam on may be illegal. I'm not a lawyer. But I'm also not alone in believing this to be a good practice.

  7. Say to yourself, "Just ride the bike."
  8. Modern motorcycles with good tires can be leaned at heart-stopping angles without falling. If you find yourself in the middle of a sweeping turn going a little too fast for comfort, don't panic. Just ride the bike. In almost every case, you'll make it through fine. Trust me.

  9. Your front brake is your friend.
  10. You should use both front and rear brakes for every stop. However, many seasoned riders use only the front brake in most non-panic situations. A bike's front brake, just as with cars, provides more than 75% of the braking power. New riders are sometimes reluctant to use the front brake probably because they falsely believe they'll flip over the handlebars. This probably stems from previous experiences on bicycles. To go over the front bars using only the front brake requires a concerted effort. Unlike on a bicycle, the center of mass for a motorcycle and rider is relatively low. Physics is on your side here. If you're not in the habit of using your front brake, you're like to have a close encounter of the unwanted kind.

  11. Acceleration is your friend.
  12. Even small-engined anemic bikes will out accelerate all but the most potent cars. Use this to your advantage. In some cases, it may be easier to avoid a dangerous situation by speeding up and getting out of the way rather than slowing down and hoping the "problem" passes you by.

  13. Be conscious of lane position.
  14. Imagine a single lane divided into 3 portions: right, center, and left. Avoid the center portion because that's where oil, antifreeze, and other fluids from cars tends to drip and therefore can be slippery--especially when it first starts to rain. Most riders don't do this, but I suggest riding in the portion of the lane (right or left) that's nearest the center of the road way. That is, if your traveling in the left lane of a 2 lane divided highway, ride in the right portion of that lane. If you're in the right lane, ride in the left portion. This positioning keeps you towards the center of the road way and makes you most visible to cars. Further, it provides you the most room in case you need to make an evasive maneuver away from the center. Many riders avoid this lane position because they think they want to stay as far away from cars as possible. This can be dangerous if a driver, who may not see you, tries to merge into the lane with you.

    Related: I avoid riding in the center lane of a 3 (or more) lane divided highway. Riding in the center lane means you need to watch cars coming from all directions. If you stay in the right or left lane, you reduce the area you have to scan.

  15. Never get between a car and an exit ramp.
  16. Invariably, the car driver will suddenly remember that the exit you are now passing is the one they want. No doubt you've seen this while driving in your car and it appears the forgetful driver doesn't see the car between him and the exit ramp. This driver will almost certainly not see a motorcycle. Because of this, I tend not ride in the right lane on interstate highways. So, this tip coupled with the previous suggests you should avoid the center of a lane, avoid the center lane (if it exists), and avoid the right lane. That means ride in the left lane. So as not to be too much of an irritant to drivers, keep you speed up!

  17. If you're a beginner, don't ride in the rain.
  18. With good tires, you can ride almost as fast, lean almost as far, and brake almost as hard in the rain as on dry pavement. If you have rain gear, even getting wet can be minimized to a minor inconvenience. So, what's the big deal with riding in the rain? Visibility--or lack thereof. A driver's ability to see you, and just as important, your ability to see them, can be severely diminished in the rain. As a test, turn your windshield wipers off in your car the next time it's raining and you'll see how hard it is to see.

Tuesday, September 18, 2007

Bikeweek 2005 - Moto Guzzi Friends Ride to Lunch

My wife and I have attended each Daytona Bikeweek from 1999 to 2005. (We've skipped the last two for scheduling conflicts.) The day after we arrived at Bikeweek 2005, it rained and was very cool. Generally, this is a poor combination for riding and it keeps most posers in their hotel rooms watching daytime soaps. However, we met up with an intrepid group of Moto Guzzi riders who were undaunted and planned a ride from Lake Monroe Park near Sanford, FL to the Blackwater Inn Restaurant in Astor.

Obviously, riding in the rain with the temperature hovering in the upper 50s, is less than ideal. But we're tough!

My wife and I are 3rd & 2nd from the left. All of us are suited for a rain ride.
Our riding companion for this and many other rides is to my immediate right.


This is a Google Earth view of the ride based on my GPS track.
I know it's difficult to see, so here's a Google Map showing the route. Despite the rain, it was a nice ride.


View Larger Map

Sunday, September 16, 2007

Bikes R Us

I've been asked about the bikes we ride. Here's a short history:


I thought I knew a little era:


In the mid 60's, my first two wheeled vehicle was a lawn-mower powered minibikes. It had a rigid frame, centrifugal clutch, no gears, and essentially no brakes. I rode it 'til it died. But the imprinting had been done and there was no turning back on 2-wheels.


I soon graduated to a Honda 50cc MiniTrail. Again a minibike but with larger tires and a 4 speed transmission. Still a centrifugal clutch that simply required twisting the throttle closed before making a shift--a good learning bed for the mechanics of a proper motorcycle. Alas, this bike had too many close encounters with tall leafy plants with strong trunks.


The last of these small bikes was the Honda SR70 Trail. This was the first non "minibike" motorcycle I rode. Like it's smaller brother, it had a 4-speed transmission with centrifugal clutch. I don't remember what happened to this bike.

I thought I knew it all era:


The Kawasaki KE100 100-cc trail bike was the first technically street legal motorcycle I rode. But I was still several years from getting a driver's license and so all of the things that made this bike street legal were removed (lights, etc.). This bike led an exclusive life in the dirt eventually becoming my motocross race bike. I did quite well in the 100-cc class for a couple of seasons. Alas, the motor ultimately blew up on this bike.


Being without a motorcycle wouldn't do so I got a Kawasaki F7 175-cc dirt bike. The additional 75-cc engine size made this bike a real screamer in the dirt as compared to the KE. Like the 100, it was denuded of lights and other non-essentials and rode with reckless abandon through the woods and over the hills. After several years, when I finally got my driver's license with motorcycle endorsement, this was the 2nd motorcycle I rode on the street (see below).


Though technically a trail bike, the Kawasaki F8 250-cc was too heavy for the dirt--at least for a scrawny kid (yes, there was once a time when it was correct to describe me as scrawny). The F8 was my "first car"--my first fully licensed street vehicle. I rode it on nearly any paved street within a 100-mile radius of my house. Being too broke to buy new tires when they wore out, I reassembled my F7 175 (which by that time, had been dismantled and was in boxes) and rode it on the street until its tires also wore out.


My first real street going motorcycle was a Honda 750 Nighthawk in the early 80s. This bike is among a class of bikes known as the UJM. I took many long rides on this bike. At that time, a "long ride" was defined as a ride sufficiently long that when I dismounted, I could barely walk. This bike was the first of my ride-through-the-winter bikes. Unfortunately, since it was also during my "I know everything" period, I rode without the benefit of winter motorcycle riding gear. It's a wonder I survived.

In spring 1985, the morning after a rain, I was leaned over in a turn at speed when I came up on a relatively large water puddle in the middle of the road. Before I knew it, I was sliding across the pavement trying to remember if a car was behind me. I watched my bike slide past me (it had more momentum than me) and have a close encounter with a tree. I was stopped in the ditch on the side of the road and didn't hit anything particularly solid. After some moments, I got up, picked my bike up, and rode on to work with bent handle bars, broken bike bits, and small pebbles ground into my legs and shoulders. I ultimately replaced the broken parts, but life started to impose other pressures not the least of which was a move from southern to northern VA. My Nighthawk stayed home in my parents garage where it stayed for nearly 10-years before being sold.

I realized I didn't know squat era:


After a 10 year hiatus, I decided in 1996 to get back into motorcycling. I mused of purchasing a Harley and made a good faith effort at several local Harley dealers to give them my money. However, this was the heyday of Harley when they sold everything they made and 18-month waits with $1000 deposits were the norm. This struck me as unAmerican. I went to the Honda dealership and rode off with their American Classic Edition Shadow--an unabashed Harley clone.


Alas, the ACE was too much of a Harley clone in that it didn't have much giddy up. The next year, I traded it for the brand new 1997 Honda Valkyrie. Fitted with Honda's trademark 6-cylinder horizontally opposed engine hopped up to include 6 carburetors, the Valkyrie had all of the giddy up I needed. Maybe a bit too much as I quickly became a collector of speeding tickets with its concomitant collection of increased insurance premiums. This bike is a masterpiece. In March 2004, I turned 100,000 miles returning from that year's Daytona Bikeweek.

For a short time in 2000, my son & I shared saddle duty on this Kawasaki EX500 Ninja. Though technically a "beginner's bike", this motorcycle is a blast to ride even for seasoned riders. My only complaint was the sport bike riding position was hard on a non-sport bike body...I ultimately sold it. Sigh.


In August 2004, as a "gift to self", I purchased the Ducati Multistrada--the Ducati for guys too creaky to ride laid down on a sport bike but too deluded to admit they don't need an Italian bike. Admittedly, this bike is the most fun 2-wheeler I own. (I still have the Valkyrie though :)

(Note: The flames are gone. There were put there as a joke. Don't flame me for defacing a Ducati.)

The Present, I'm learning something new, era:


At Bikeweek in 2005, my wife purchased a Honda Goldwing Trike fitted with the California SideCar conversion kit installed by Trikes by Tony. Concerned with balancing a 2-wheeler, my wife took to three wheels like a fish to water. The 2001 trike had about 10,000 miles when she bought it. Today she's clocked nearly 35,000 miles. She has ridden all around the northern, western, and southern areas of VA. She's ridden to many places in West Virginia as well as Maryland, Ohio, Kentucky, Tennessee, and Missouri. During her first summer with it she took a trip up to Lake George to attend the Americade Motorcycle Rally. This last summer, we took a 3000-mile, 13-day ride to the Ozarks. (A subject of a subsequent posting.)

A trike is not a motorcycle. But it is no less fun. A trike with the high performance of the Honda 1800-cc Goldwing engine makes for excitement all of its own.
Friday, September 14, 2007

Teaser for future posts


(Click image for larger view)

Here's an image of a Google Earth snapshot showing all of the motorcycle ride tracks I've recorded since 2005. It's my intent over the coming posts to single these out and discuss them in some detail. I intend to provide maps and other information of interest. In the meantime, salivate.

Wednesday, September 12, 2007

Reducing the autos...how do we do it?

For those of you that don't know, I live in the Washington DC Metro Area.

View Larger Map
In general, every day is 'Ride Your Motorcycle to Work Day' for me. I ride year around. As long as there's no snow on the road and the temperature is above freezing, I'm riding. (My temperature record was 17-deg. However, on that day my eyeballs started to freeze so I upped my limit by 15-deg. Yes, there's a fine line between showing commitment and needing to be committed.) Rain is a nuisance but not a deterrent. Summer's heat can be as much of an inconvenience as winter's cold--but I remain steadfast on two-wheels.

What's been cramping my style lately is the number of automobiles on the road in this area. The WMA traffic woes are not just during morning and evening rush hours on the weekdays. The weekends, particularly in the summer months, are equally horrendous.

I'm soliciting ideas for how to get some of these cars off the road. Seriously.

Tuesday, September 11, 2007

Labor Day Ride

Labor Day Ride


My wife and 2 friends decided to take our bikes for a ride on Labor Day 2007. We planned to ride to Yorktown, across to Jamestown, and then back to home. Wanting to get a quick start, we headed to Fredericksburg, VA via I-95. The Interstate is not something we relish, but we were wanting to make time.

Getting off at Rte 17 heading south we stopped for breakfast in the old town of Tappahannock at Lowery's Seafood Restaurant. We continued south across the York River Bridge to Redline Motorsports so I could test ride one of the new Ducati Sport Classics (a topic for a subsequent posting). Having got that out of my system, we went north on Rte 17 to the Colonial Parkway heading for Jamestown. The Colonial Parkway is a pleasant, low-stress road for bikes. The scenery is nice and the pace just right.

At the end of the Parkway, we took the Jamestown Ferry across the James River to Surry. We continued north to Hopewell where we crossed the James River again heading back towards home.

Having traveled 358 miles averaging a speed of about 37-mph, we arrived home nearly 12 hours later. The weather was beautiful all day and we agreed this was one of the better Labor Days we could remember.

Here's our route:

Monday, September 10, 2007

Rte 211 between Warrenton & Luray


Without contest, Rte 211, aka Lee Highway, is one of the best motorcycle roads in the northern area of Virginia. It lays east to west connecting Warrenton with Luray. Crossing over the Blue Ridge Mountains it widens into 3 lanes giving the uphill side an extra lane for the switchbacks--this is superb when slower traffic is between you and motorcycle bliss. If in this area, you owe it to your self to check out this road.

Where: N38.661609°, W78.321467°


View Larger Map

Sunday, September 9, 2007

First Posting

This blog will chronicle motorcycle rides I take with my family and friends down the street and beyond. I'll intersperse thoughts and comments from current rides with those I've taken previously. Feel free to comment along the way.

Have a good evening....john the rider guy