Step 1 - Learn to ride a bicycle.
If you don't know how to ride a bicycle, starting with a motorcycle is not recommended. Learn to ride a bike. Balance and turning on a single track vehicle is the same regardless of whether it is engine powered or pedal powered.
Step 2 - Motorcycle controls.
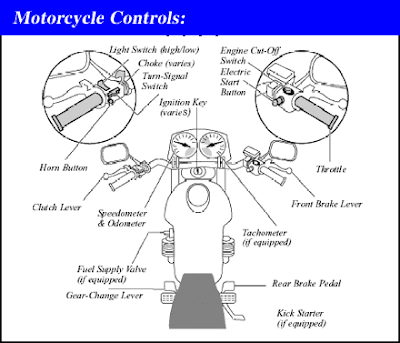
The hand and foot controls are the same for all motorcycles built since 1975. Count this as an advantage. Some older motorcycles, especially those from Britain, had the gear shift location and shift pattern opposite than other bikes and keeping mental track of this was, at least for me, a herculean task.

The sketch above can, at first, appear busy and therefore intimidating. So, let's focus on those controls associated with riding and leave the others for later.
Specifically, the hand and foot controls:
- left hand lever operates the clutch
- left foot lever shifts gears
- right hand lever operates the front brake
- right foot lever operates the rear brake
- right hand grip operates the (twist) throttle
An aside:
Operating a clutch.
Knowing how a clutch works will greatly facilitate your learning to ride a motorcycle if you don't already have experience driving a car with a manual transmission. If you know how to use a manual transmission, skip down.
Sequential shifting.
(The following description is correct for almost all motorcycles. The most common exception will be motorcycles with 4 or 6 speed transmissions.)
Motorcycle transmissions use sequential shifting operated by the left foot. The shift pattern is "1 down, 4 up". This means first gear is engaged by pressing the shift lever down with your toe. Second is engaged by placing your toe under the lever and lifting up. Lift up again for third. Fourth and fifth gear are done the same way.
To down shift, do the opposite: Press the shift lever down with your toe to go from 5th to 4th, press again to 3rd, again to 2nd, and once more for 1st.
Neutral is located "half-way" between first and second. This can be confusing at first and some bikes are particularly difficult to find neutral requiring rocking back and forth at a stop or shifting to neutral before stopping--you'll learn the idiosyncrasies of finding neutral on your bike soon enough.
Step 3 - Riding.
Ride with your motorcycle-owning friend to an open parking lot. Stop the bike in a clear area and shut it off. Convince your friend to let you sit on the bike. Put both hands on the handle bars, leave the bike on its kick stand, and put both feet on the foot pegs. (Yes, you'll be leaning to the left.) Pull in on the clutch lever with your left hand. Do this several times to get the feel of engaging and disengaging the clutch.
If it feels like only Arnold Schwarzenegger can operate the clutch, then you're on the wrong bike. Find another motorcycle-owning friend and start over with this step.
You can try putting the bike in gear with your left foot, but this is uneventful unless the bike is running. So, give the owner $2 and ask him to buy a soda at 7-Eleven. After out of sight, pull the bike up and raise the kick stand, turn the key, press the starter button, and blip the throttle (biker speak for 'turn quickly') no more than about 1/8th of a turn. Blipping the throttle doesn't help you put it in gear, but it sounds cool.
Pull in the clutch, support the bike by leaning a bit on your right foot, raise your left foot to the foot peg and press the gear shift lever down into first. You'll feel the bike lurch and hear it "clunk." Put both feet on the ground. Slowly (s-l-o-w-l-y) let the clutch lever out (disengage the clutch) until you feel the bike just beginning to move. Pull the clutch back in (engage the clutch). Do this several times until you can anticipate, based on the clutch lever position, when it just begins to engage.
With both feet on the ground, slowly let the clutch out. Just before the clutch begins to engage, twist the throttle slowly and no more than about 1/8 of a turn just as you did when you were looking cool. Continue to engage (let out) the clutch as you turn the throttle keeping your feet out as "out riggers." Never letting go of the clutch lever, let the bike inch forward a foot or so and pull the clutch back in completely and gently squeeze the front brake (right lever) until the bike stops.
After doing this several times, stop the bike, turn the key to off. Extend the kick stand and carefully lower the bike on it. Dismount the bike and give yourself a hand. You just rode a motorcycle.
Step 4 - Practice.
Repeat step 3 until you are moving further and fast enough to confidently raise both feet to the foot pegs. Do not try to do too much too soon. Several small successes are more important than a large one.
Do not ride on the street until you are completely comfortable and confident. Riding on the street requires complete concentration on road conditions and safety, your focus should be on these things and not the mechanics of riding. You want to be able to confidently ride the bike in the parking lot shifting the gears both up and down, braking, and turning. Only after mastering these steps are you ready for the street.
No comments:
Post a Comment